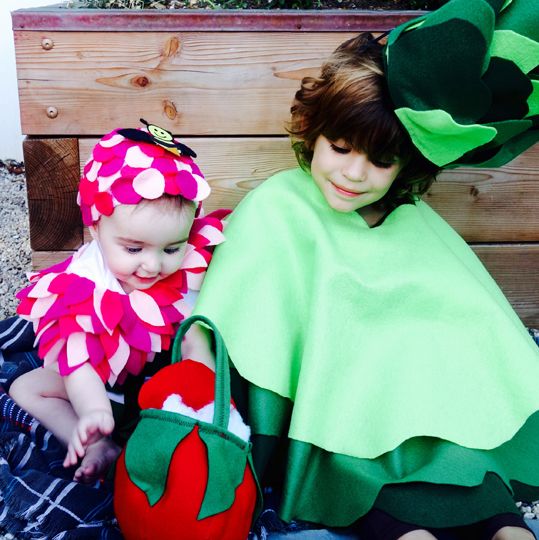
“Grow In The Garden” DIY Costumes
Need a last minute idea for Halloween? Here are step-by step directions on how to make two cute costumes that grow in the garden:
Flower Costume
Materials:
- Several colors of felt, I used 3 colors of pink and 2 greens
- Hot glue gun and glue sticks
- Infant hat (I used a pre-fab crocheted white one)
- Onesie infant garment (white)
- 2-1 inch strips of Velcro
-
Scissors
Steps:
- Using patterns, cut out two of the bib forms, I used light pink. One will be for the front and one for the back
- Cut out the petals in the various colors
- Beginning at lower edge of the bibs, hot glue petals alternating colors and slightly layering until filled leaving the top one inch at the shoulders
(shoulder straps) with out petals
- Hot glue Velcro strips to the shoulder strap, one half on the front & one
half on back
- Cut out a lot of circles from same felt colors as the petals
- Using hot glue attach and cover entire surface of the infant cap
- Cut several (3-4) leaves from green felt using pattern and cut a strip
(stem) the length of the garment to mid chest
- Hot glue leaves to strip
- Hot glue leaves and stem to onesie garment
- Optional, make a cute honeybee out of paper to attach to cap!
Head of Lettuce with Hat and Cherry Tomato Bag
Materials:
- 1 yard each 3 colors of green 60 inch felt
- Hot glue gun and sticks
- Cardboard (at least 6×6 inch square)
- 1 small sheet red felt
- Elastic for neck strap
- Scissors
Steps (Garment):
- Using a t-shirt from the child the costume is for measure from neck to waistband and add a few inches, this will be the radius for the cape that will become the garment/lettuce leaves
- Fold each of the yardage of green felt into in half twice and measure out the distance from the T-shirt, mark on the two folded edges.
- Cut curvy quarter circle from one corner to other in the color you want on top. Do the same for the other 2 but add 2 inches to the length. Before unfolding, cut an opening slightly bigger than the approximate size of the neck opening on t-shirt.
- Open the felt circles and layer on top of each with the smallest one on top. You now have the garment complete!
Hat
- For hat, cut a circle from the cardboard square and matching circle of
green felt and hot glue felt circle to one side of cardboard circle
- Optional, cut a corresponding circle from green felt that is approximately
2 inches bigger
- Slip-stich on edge of felt circle and gather, fill with cotton or fiberfill and
insert covered cardboard circle. The puffy side is the top (you can skip
this step but the hat will not have as much structure)
- Cut a lot of the “lettuce leaves” in the 3 different colors and begin to hot glue in alternating colors and layers around the edge
(see pictures)
- Once you have a nice perimeter of several layers, moved to the inside
and attach moving upward and in. Last several layers should be glued so
they fold in slightly
- Attach with hot glue the elastic strap for the neck coaxing it under the
felt to the cardboard and secure, try on to figure out length before attaching the second end. Hat is complete!
Bag
- Cut 6 sections/segments using pattern from red felt
- Cut 4-5 of the “leaf” patterns from green felt
- Cut a 10 inch by 2 inch wide strip of green felt
- Sew the edges of the segments to form a sphere
- Using the zig-zag stich, sew the leaf sections, overlapping the edge around the opening
- Still using zig-zag, fold strip in half and sew the length
- Attach doubled strip to each side the “cherry tomato” to form a handle
- Cherry tomato bag is complete!