Beauty...
Be your own
kind of beautiful
Be your own
kind of beautiful


I’m a mama who tries to keep it green, so when I saw all of the super chic “au natural” Easter egg dyeing techniques on Pinterest, I knew I had to give it a try. In the end, they turned out insanely AH-mazing, but I need to be perfectly honest and say that it was an incredible time commitment!! If you have little ones, probably near impossible because you will need to have multiple cauldrons of veggies and eggs boiling for about an hour. Not to mention the hand eye coordination and time dedicated to playing with pantyhose and unwilling herbs(what do you mean I can’t wrap you perfectly flush around an uncooked egg??!!!). That being said, this would be a perfect project to do with older kids. Pretty cool to see how brilliantly bright nature can be and with the added artsy fartsy bonus of using leaves as stencils.
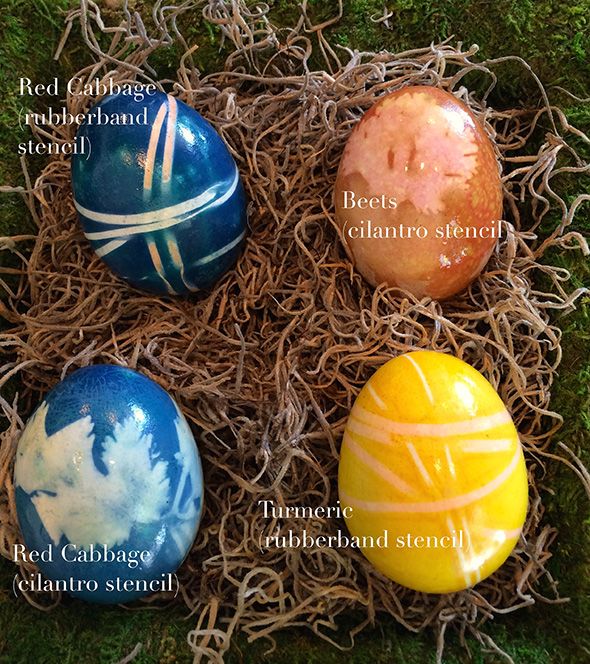
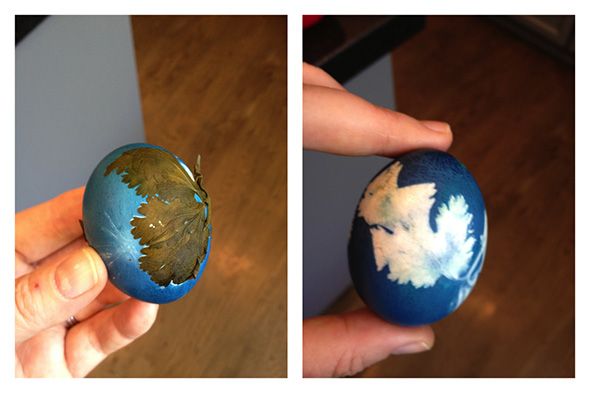
I attempted this project twice for the sake of science, perfectionism and the love of the readers on MollySims.com. I even created a quick video of my tips and tricks to make your life easier and hopefully save you some time. The biggest takeaway tip on this project is that you have to have plenty of time to execute if you want the darker more brilliant colors. The beautiful blue hues created in the image above are a result of the eggs soaking in cabbage juice in my fridge over the weekend. Unquestionably gorgeous, but this is not for those who seek instant gratification!
For blue dye:
For yellow dye:
For red dye:
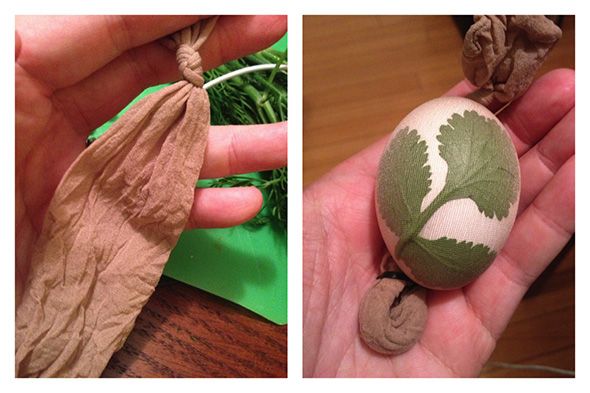
First thing to do is prepare your eggs. Take uncooked eggs and the stencils you desire. If you are using herbs, the trick is to get the foliage to stick perfectly flush to the egg. I used a damp sponge (maybe I licked it like a postage stamp, but I’m not telling!) Then you take a section of the pantyhose and secure the egg tightly by making a knot or using a twist tie, rubber band, etc.
Once you prep all your eggs, set aside. Make sure to leave a few eggs without embellishment. They are absolutely gorgeous on their own.
Each saucepan should be filled with water at least an inch above your eggs. I used a stunt egg as my measurement device. Then using the recipes above, add the cabbage, beets and turmeric to each saucepan and bring to a boil. Turn down heat a bit to keep it at a simmer for about 20-30 minutes. Don’t do this step too fast, or all of your liquid will evaporate.
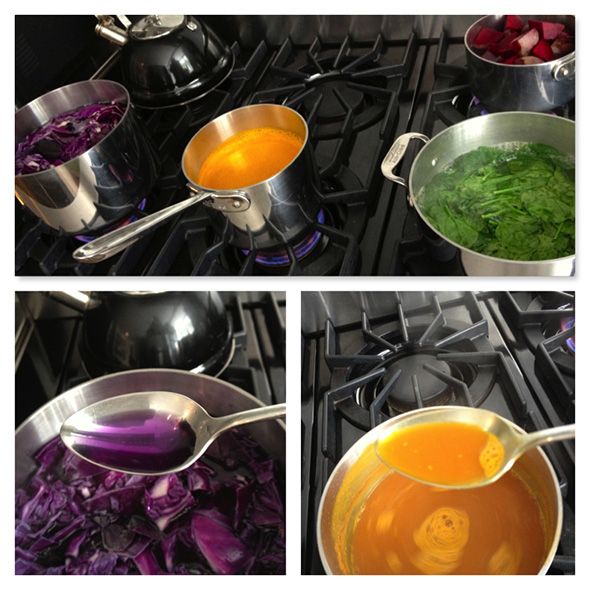
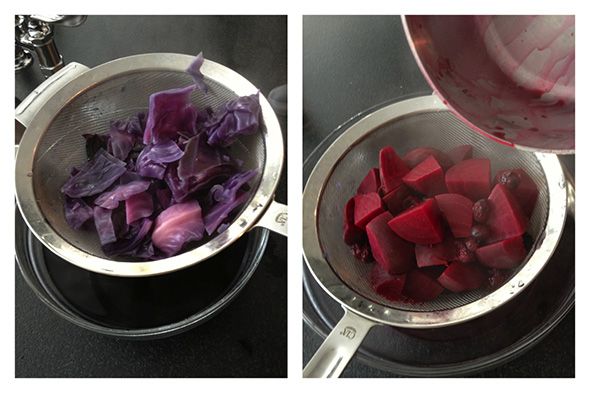
Let the liquid cool for 20 minutes, then place strainer over a bowl and pour to remove all excess materials.
Place the liquid back into the saucepan now adding your eggs and vinegar. Cook on medium heat for 30 minutes. Turn off heat and keep the eggs in the liquid for a few hours.
As I mentioned before, if you want the uber rich colors, once everything cools, transfer into a lidded container and place in your refrigerator for at least a day.
Once you have reached the desired color, use a slotted spoon to remove your eggs from the dye to dry completely. I used my egg carton as my drying rack. Once completely dry, cut off the panty hose and slough off the foliage. Same goes for the rubber bands or stickers. Remove all embellishments and clean the egg with a paper towel.
Lastly, I like to take add a touch of cooking oil (any kind) and shine the egg up to a perfect Easter glow! Yes, this project was a serious undertaking but the final results were definitely worth it. Please make sure you check out my video below for my quick tips!!