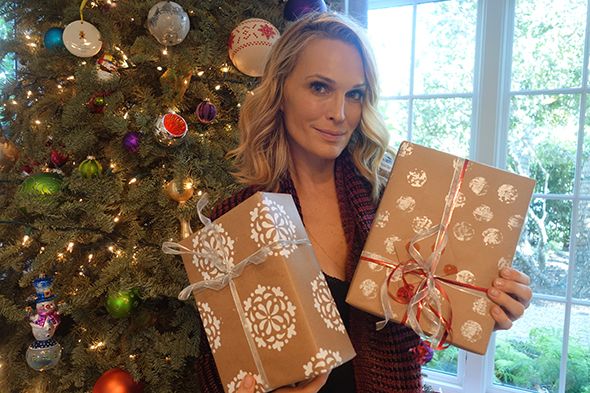
How to DIY Your Own Wrapping Paper
As you know, I love a good DIY especially I can do it with my Brooksie. He love, love, loves being able to participate. We recently ran out of wrapping paper here at the house but we did have two things—brown craft paper and stamps. So, we got creative and made our own!
Materials:
- 1 Roll Brown Craft Paper
- Balsa Wood, 4” x 12”
- X-Acto Knife
- Ruler
- Sponges (any kitchen sponge will work)
- Window Seal Adhesive Foam (available at any hardware store/Home Depot)
- Stamp Pads, various colors, I used silver
- Acrylic Paint (various colors, I used red and white)
- Corks
- Hot Glue gun
- Commercial Made Stencil
- Cookie sheet or plastic cutting board (you will be putting paint onto this)
Directions:
Cork Pattern Stamp
Skill Level: Super Easy and kid friendly!
- Find a cork, I liked using one from a champagne bottle as it is a little bigger and easy to hold onto
- Choose a color/stamp pad
- Roll out craft paper, I secured mine using rocks from my patio (it likes to curl up)
- Apply ink to cork and apply to paper as precisely or as randomly as you like! Children can easily help with this. Super cute, super easy!
Quilt Stamp
Skill Level: Easy
- Using X-Acto knife and ruler cut the balsa wood into 4×4 inch squares.
- Attach with hot glue a cork onto the back to serve as a handle. This will be the base for your stamp
- Cut lengths of the Adhesive Foam the width of stamp and adhere, I did 4 simple stripes
- Generous distribute paint on your cookie sheet/cutting board, I used red
- Cover the surface of your stamp with paint and apply to craft paper in a pleasing pattern, I altered the direction to make a cool graphic pattern similar to a quilt pattern.
- Allow to dry and you have your own one-of-a-kind wrapping paper!
Christmas Tree Stamp
Skill Level: Moderate
- Follow steps 1 & 2 above.
- Draw out a design, I did a Christmas tree. Best to go with simple/graphic shapes; candy-canes or stars would be nice too. It needs to fit on the sponge.
- Trace pattern onto sponge and cut out carefully using X-Acto knife.
- Glue to your “stamp”, if using sponges that have a “scrubby” side like I did, be sure to glue the squishy/sponge side up.
- Follow steps 4 -6 above.
Stencil Paper
Skill Level: Easy
- Purchase a stencil of your choice.
- Adhere stencil to craft paper with masking tape.
- Using make up sponge carefully dot ink to fill the stencil.
- Remove and reposition and continue till the paper is filled.
Need wrapping tips? Check out some great pointers from Black Inkhere.